Lightweight Mouldings
Lightweight MouldingsExterior Mouldings
Exterior MouldingsPlaster Mouldings
Plaster MouldingsFireplaces & Stoves
Fireplaces & StovesCast Iron Radiators
Cast Iron RadiatorsFREE delivery on online orders over £200 from lightweight range

Company


Inspiration

Help & Advice

Special Offers
Fitting a dado rail, also known as a picture rail is a fairly straightforward DIY project which you can undertake yourself in your home. We’ve put together some tips on how to fit a picture rail, with all the right tools and materials to do so.
Please note, you can use your own alternative tools if you are unable to use any of the items listed above. If you do opt to use a different set of tools, be sure to remain safe and take care while doing so.
Before we get started with fixing the dado or picture rail to your wall, as with any DIY project, preparation is key to achieving your desired finish. In order to ensure you get the look you want when you install your picture rail, you’ll need to make sure that your walls are clean, sanded, and that any necessary repairs or plastering is complete before you add any kind of dado or picture rail. You’d be surprised how much even the smallest bit of uneven surface, be it grit, paint, or plaster, can impact the addition of rails over the top!
Top tip: paint your dado rail before you hang it; this will ensure you have a flawless finish, with tidy edges.
After you have your walls appropriately prepared, it’s time to get down to the nitty gritty of adding the rails:
The first step is to measure the wall length in centimetres (the more accurate you can take the measurement, the less margin for error there will be). Take a note of the length, and measure it twice to make sure you have the right numbers before you start cutting your rails to size.
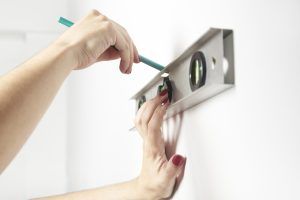
Top Tip: be sure to use a surface level to ensure there’s no lumps or bumps in the paint or plaster before adding your rail. It is easiest to do this during the measuring phase. If there are small lumps or bumps in the plaster or paint, you can use a piece of sandpaper to sand it down.
When you are happy with your measurements of your wall, measure against your dado rail to ensure you have a rail that is the right size for your wall. If not, you can use a pencil to mark on the dado rail where you’ll need to cut it down to size.
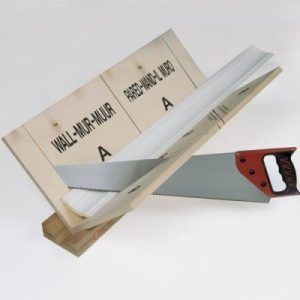
Always remember to double-check your measurements before you cut anything. To cut the perfect angle for the wall, use a hand saw and mitre box, which makes it a lot easier to cut at an angle, if needed.
With your dado rail cut to size and your wall measured, it’s time to fit the rail to the wall. Before fitting your first piece of picture rail, it can help to measure and mark the wall with chalk to give you a clear guideline of where to fit your dado rail. This will also help you plan how the multiple pieces of picture rail will fit together if you are using more than one piece.
First use the tape measure and pencil to mark where you want to position the rail, then use the spirit level and chalk to create a perfectly horizontal guideline along the wall. Keep moving the spirit level around the room until there is a guideline across the entire wall. This will make fitting the rail a lot easier.
Take your time with this process, there’s no need to rush it. It is better to do it slow and steadily to make sure it’s done correctly.
With your wall marked, take the first piece of rail, hold it in position, and use the spirit level to make sure it’s perfectly level. When it is level you can either nail it to the wall or glue it into position.
If using nails, be sure to add a nail every 50cm or so, and be sure to nail it in place avoiding water pipes and cables. While the nails needed to hold a dado rail in place won’t penetrate your wall very far, it is important to have a pipe map or cable map for your room to hand to be positive you won’t damage anything when nailing the rail into place.
If you are using adhesive, create an even zig-zag across the back of the picture rail and press firmly into place. Using adhesive is by far the easiest way to install dado rails, as it helps you to create a flawless finish. Using nails will require you to caulk the nails to fill in the imperfections.
At WM Boyle we have a range of great Decofix glues and adhesives to ensure your dado rail remains secure. They give additional strength and durability to the joints of Orac products. Our Decofix Pro is our extra strong installation adhesive, which ensures a long-lasting seal between the mouldings of your dado rail.
Most of our adhesives are available from stock and are normally delivered straight to you within 2-3 working days.
Learning how to cut dado rail corners is an important step in any project using rails; doing this correctly will help your interiors look professional.
When cutting your corners take your next piece of picture rail and hold it to the wall so that end touches the already fitted piece. Mark the end touching your fitted piece with a pencil as you will need to cut this before fixing it in place.
Use one of our Mitre box products and a hand saw to cut a precise straight, 45-degree cut in the same direction as your marking. Then, to ensure your dado rails are as seamless as possible, use sandpaper to smooth the profile, so it perfectly fits over the installed piece.
From this point, with your picture rail prepared, it is a simple case of installing it on your wall like you’ve previously done in step three. We’d recommend using the same method – be it adhesive or nails – to keep the look of your dado rails consistent.
Now that your first piece has been fitted, you can line up the rest and fit them as you go. Simply repeat the above process until you have fixed the remaining picture rails to the wall.
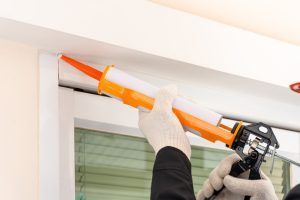
To create a flawless and professional finish, use the caulk gun to fill in any gaps in the joins and create a seal with the caulk where the rail meets the wall.
The following video has more information on fitting panel mouldings such as pictures and dado rails.
Picture and dado rails are simple additions to your home but create a dramatic effect on the aesthetic of your room. With a range of styles to suit all homes, the design possibilities of dado and picture rails are endless. With a large range of sizes and styles, our rails are extremely durable and suit all homes, from traditional high-ceiling spaces to new, contemporary properties. Discover our dado and picture rails.
While this guide goes into depth about installing or fixing dado rails and picture rails to your wall, you may want to remove old rails or fix a mistake you’ve made. To remove dado rails you’ll need to use a claw hammer to carefully pry the rails from the wall. You’ll then need to use stain remover to get rid of any adhesive or paint stains, use a flat nose chisel to get rid of any left over adhesive or paint flakes, and sand the surface for a smooth finish. You’ll also likely need to use some kind of filler or plaster to fill in any holes, and again sand this for a smooth finish (ready for a fresh coat of paint).
There’s no rule for how high or low a dado rail should be, but most dado rails are installed close or directly on the middle of a wall. How high you fix your dado rail will depend on other decorative features of your interior and what ‘looks right’. If you are struggling to determine what this is, usually, dado rails are fixed between 0.9m and 1m from the floor.
This will be wholly dependent on your personal preference and the overall aesthetic you want for your room or home. At WM Boyle we have a wide range of dado rails to choose from, including traditional designs, modern designs, and plain designs.

13th May 2026
We are delighted to announce that we are now stockists of the beautifully crafted NOËL & MARQUET range of coving,...
Noel & Marquet Collection
4th June 2025
Using Wall Panels in Modern Interior DesignYou've selected some products for comparison. Click here to compare the products you've selected.
View Products


")


