Lightweight Mouldings
Lightweight MouldingsExterior Mouldings
Exterior MouldingsPlaster Mouldings
Plaster MouldingsFireplaces & Stoves
Fireplaces & StovesCast Iron Radiators
Cast Iron RadiatorsFREE delivery on online orders over £200 from lightweight range

Company


Inspiration

Help & Advice

Special Offers
Adding your own flair of personality to a room with paint is a must. The boring old ‘landlord’ white needs to go! Decide to update your spaces, add some character to your home and make each space your own.
As you’ll know by now, an easy way to add some pop to any room is by accenting your interior with painting coving and skirting boards. We’ll be focussing on how to paint coving and help you achieve your aesthetic goals for your home or flat. Let’s get painting!
What we love about DIY here at WMBoyle is how diverse and personalised you can make your interior. Why settle for something mundane when you can match your paint styles with your decor style for a holistic approach to designing your rooms?
Whether you like to stick to tradition or like a little flamboyance, there are endless design opportunities when it comes to painting, such as;
The traditional coving look is timeless, has been a staple of home design for centuries, and is a great way to evoke the feel of classic Victorian and Georgian styled estates. It is a fantastic style that’s wonderful at adding a sense of grandeur, or a touch of formality to a home’s look – think of it like a well tailored suit or formal dress, but for your home.
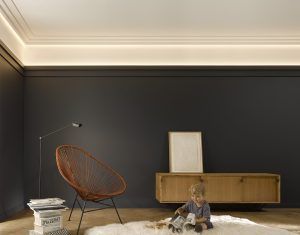
We love it when coving contrasts with a strong interior wall colour, for example, white coving alongside rich greens and blues. This helps to create a finished look that isn’t a cookie-cutter style design that most homes adopt.
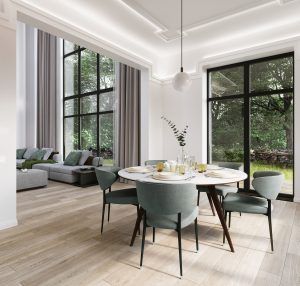
If you think your interiors would benefit from having walls that look taller, then painting your coving the same colour as your wall is the perfect way to accomplish this. For homes that may have larger, vertical styled radiators this look can work very well – it will help your spaces seem big and airy instead of cramped and tight.
Painting your coving opens up a realm of possibilities for decorating the rest of your room for various effects. For instance, having colourful ceilings is a great way to highlight your coving and draw attention to the architectural details that help create a unique aura for your home. Break free from the expected, dull off-whites and imagine soft blues, sunset yellows and terracottas, or even soft violet to create an inviting and eye-catching space.
Lastly, one of the best ways to use your coving in a room is to accent it. There are a few great ways to accomplish this ranging from sharp contrasts to highlight and border your room, or with soft complimentary colours compared to your walls and ceilings. Whatever you choose, accenting is a popular way to decorate and paint your coverings for more modern styles.
Discover our modern stepped coving.
When it comes to painting cornices and coving, the choice is ultimately yours, but there’s plenty of options to choose from. At WM Boyle, we’d recommend that you use a water-based paint that can be applied to interior walls as this will be the easiest kind of paint to work with for a DIY interior design project.
No matter what kind of paint you opt to choose, you should always think about the amount of sheen you would like to achieve. This will help your coverings and cornices either blend in or stand out according to the amount of light that hits them (with silk style paints being the type of paint that has the most sheen and matte being the type with the least sheen).
We’d recommend getting a few testers or looking at a few example pieces of painted coving to get a feel for the kind of sheen you want for your home.
Discover our Orac C395 uplit coving.
For the best finish and minimal mess, we’ve created a step-by-step guide that will help you achieve the look you’re looking for – without the stress.
Before you begin painting you’ll need to prepare your space. We can’t emphasise this enough. Always prepare your room before painting. Because you’re painting at a height, it’s important your paint is accessible to you and everything valuable is covered to avoid damage (such as tables, lamps, sofas and so on). Ideally, you’ll want to use plastic sheets or tarps to cover your belongings.
Top Tip: When buying paint, do remember that when our Orac coving and cornices come primed which means there’s no need to buy primer. All you need to do is install them and paint away to your heart’s content!
Cover your floor with a dust sheet, move your furniture and cover everything you don’t want painted using plastic tarps or sheets. You’ll also want to wear coveralls, gloves, and a mask when painting to ensure you don’t get any paint on your hands or in your mouth. Paint can also produce a very strong smell, so it is important to keep your room’s windows open to ventilate the space.
Apply masking tape or masking film around the coving and on the ceiling just above the length of the coving to avoid paint mismatches. Run your thumb along the tape to make sure it’s stuck properly. If you’re going free hand the painting process, then this step doesn’t apply to you. However if you’re new to interior painting, then masking tape will give you the best possible finish.
Use a medium sized nylon or synthetic paint brush, dip your brush into your paint, not too much – avoiding spillage and splashes. Apply the paint gradually, starting with small sections. If you’ve got masking tape, you can start at the edges and work inwards, but if you’re going free hand, we’d recommend starting an inch away from the corners and slowly working your way towards the edges to avoid excess paint on the ceiling.
Top Tip: For traditional detailed cornices with patterns, perhaps a smaller brush would be useful as you want to dab the brush into any crevices.
After applying your first layer of paint to the entire length of the coving, leave it to completely dry out. You’ll want to leave it for around two to three hours. Leaving your windows open during this time will speed up the drying process. Do not, however, use any fans or blow dryers to speed up the process. Let it dry naturally.
After your paint has dried, inspect your work, and make sure you’re prepared with everything you need before applying a second layer of paint. The second coat of paint always tends to be slightly thicker than the first, so make sure you apply this coat evenly for a smooth finish. Apply the paint to the entire length of the coving and then;
If you are using a lighter colour, you may need to apply a third coat. If that is the case, then follow the drying and painting process one more time to add your third coat.
If happy with the paint job, carefully and slowly peel away the masking tape when the paint has finished drying. Make one last inspection pass of the coving to be sure you’re happy with it!
And just like that, with our step-by-step painting guide, the potentially intimidating process of painting your coving just got that little bit easier; all at an affordable price. Whether it’s a traditional intricate cornice for your living room, sleek and smooth modern coving for your master bedroom, our range of Orac covings and cornices look spectacular with a splash of paint.
Coving is something we’d always recommend painting with a brush – specifically a wide oval brush – as this is the ideal shape to paint both the larger sections of coving and the more intricate details. We’c recommend against using a roller, as a roller can’t effectively paint the more intricate details and corners of a room’s coving.
If you are using our Orac coving, then no. All our Orac coving comes pre-primed and ready to paint. If, however, you opt to use plaster coving then you’ll need to apply plaster primer before painting it.
Usually when painting coving it is best to paint the faces of the coving that will be visible. You can opt to paint the coving and then install it if you are doing a renovation. However, if you are painting pre-existed coving you can use masking tape or film to easily isolate the coving you want to paint.
This is all down to personal design preference. Usually, people choose to match the colour of their coving and their skirting boards as this will make a room look uniform – but this is entirely down to your own discretion as to what you think looks the best.

27th May 2026
Glasgow Showroom Summer Holiday Please note that our Glasgow showroom will be closed for summer holidays on the following dates:...
Summer Holiday – Glasgow Showroom
13th May 2026
We are delighted to announce that we are now stockists of the beautifully crafted NOËL & MARQUET range of coving,...
Noel & Marquet CollectionYou've selected some products for comparison. Click here to compare the products you've selected.
View Products


")


